Install
Below are detailed instruction on installing your rock treads aluminum discs to any boot or shoe*
If you have questions, please email us with a picture of your boot and we will custom design a pattern for you! If you want us to install them for you, contact us as well, we will do it! Forrest@rocktreads.Com
*Not to be used on bootfoot waders, they will leak!
-
RUBBER SOLED BOOT INSTALL VIDEO
-

FELT SOLED BOOT INSTALL VIDEO
-
REMOVABLE SOLE INSTALL VIDEO


In-Depth Instructions
BASIC LOCK DOWN INSTRUCTIONS
Thank you for your purchase of Rock Treads- the ultimate in traction for wading!
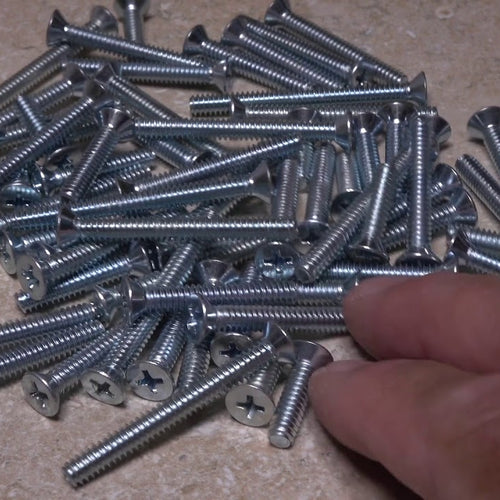
Your Rubber Felt Fixed Soles Rock Treads kit includes everything (and then some) you will need to assure a lifelong hold of your Rock Treads, no matter the brand of boot! Read all these instructions first and you fly through install.
Installation will take some time, but it’s quite simple really. Spend an hour on your boots now, and you will never mess with them again! Just drill the hole, and bolt in your Rock Treads.
You will need some patience and a cordless drill to do the install. If your boot does not have a removeable liner inside (like Simms™) you will need to put an insole liner over the top of the
kit, or you will feel the Lock Down nuts through your waders. ANY liner will work, from the cheapest Dr. Scholl’s ™ to the most expensive orthotics all work. You just need a layer over the metal hardware for comfort.
Basic
Instructions:
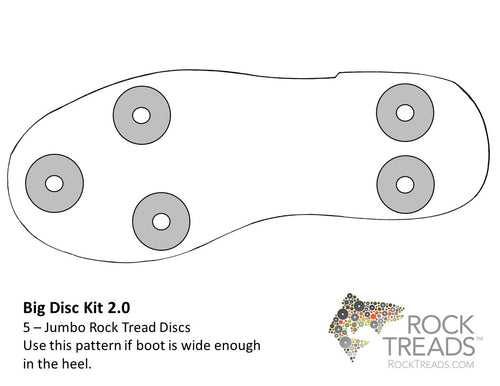
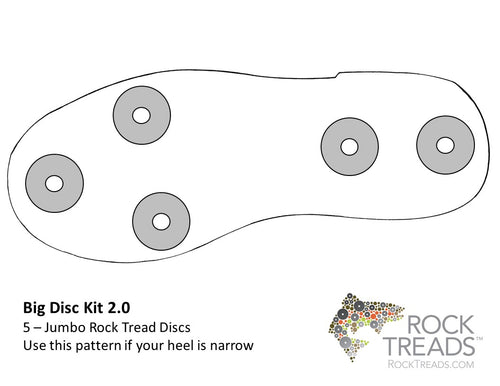
1 – Plan a pattern (see patterns on www.RockTreads.com) on
your DRY boot.
2 – Remove the insole liner. On Simms, you just gotta drill through the liner. Its barely glued in on top of their permanent insole, no harm done! You will need a liner back on top for
Simms though…
3 – Drill a hole in your boot. Its ok, its just a boot, and its underwater already. Our Lock Down system won’t harm
the integrity of your boot, it actually holds it together! Make the hole very clean, you don’t want debris to get inside the Lock Down Nut.
4 – Put the provided Red Thread Locker in the Lock Down Nut, just a drop on the end of the LD nut (NOT ON THE SCREW), insert on
inside of boot. If you have trouble, use the Setting Screw (included) to poke through, lightly thread on and pull the screw out, setting the lock down nut. Remove Setting screw, then next step. For the tight space of the toe area, hold the Lock Down nut in between your middle and index fingers, like nippers. The setting screw is key in the toe area.
5- Match the right length of screw for your boot (you don’t want it to stick out the top, but you want it to be tight on the sole. You can even compress the sole a
little, it doesn’t hurt anything).
6 – Bolt in your Rock Treads, nice and tight. Make sure the screw isn’t too long and pokes out of the lock down nut.
7 – Let the thread locker dry (couple of hours) and gone are your days of slipping and sliding!
RUBBER & FELT SOLE INSTALLATION INSTRUCTIONS
Step 1: Make sure your boot is CLEAN & DRY!! We recommend doing this in your garage or shop, there will be some debris after
install.
Step 2: Insert your provided
¼” drill bit into a cordless drill.
Step 3: Plan your pattern on
your boot, and then lay that pattern down on your work surface so you can
reference back. Or you can take a
picture of your pattern with your phone for reference. There are also pattern suggestions on
RockTreads.com. You are adding another layer to your boot bottom so be sure to
put the discs in a relatively even pattern, you want to step on an even surface while you RUN in the rivers with Rock Treads. Don’t get too close to the edges of your boot bottom, as you may not be
able to attach the lock down nut inside the boot if it is too close to the sidewall of the boot.
Step 4: Knowing where you want your first disc, drill a hole all the way through your boot.
GO NICE AND SLOW and set your drill power to 1/2!! This isn’t a race. If your boot has a liner in it, remove it. On Simms™ Boots, the liner is glued
in. It works best to just drill through the liner. After a couple of holes, the fabric will come out. This does not hurt the structure or integrity of the boot. When making your hole, run the bit up
and down several times in the boot, make a nice clean hole. You don’t want debris to get inside of the Lock Down nut when you put the screw in.
Step 5: Take a Lock Down Nut,
and place a drop of the provided RED Thread Locker into the tip of the lock down nut (DO NOT PUT ON THE SCREW) . Then push the lock down nut into the drilled hole on the inside of your
boot. If you are having trouble getting it into the hole, take the Setting Screw in the kit (the longest screw in there, there are 2 of them) and poke it through the bottom of your boot. Then take the lock down nut and place on top of the screw, thread it on with 1 turn and then pull the setting screw out, seating the lock down nut nice and flat on the inside of your boot.
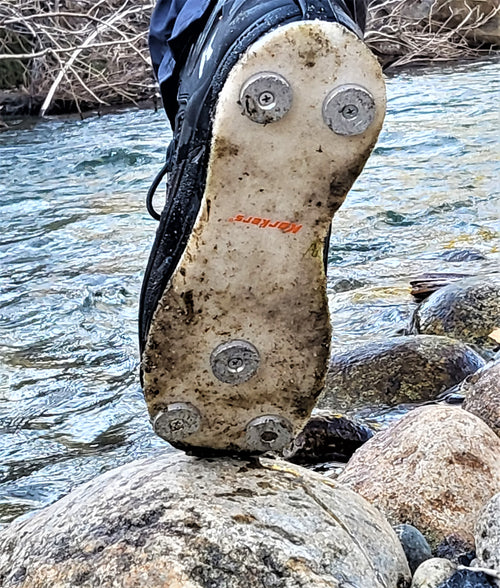
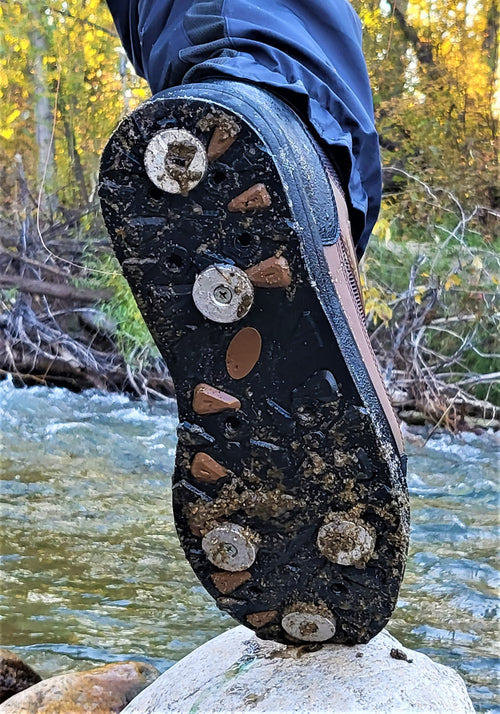
Step 6: Grab a Toe or Heel Screw, put on your RT disc
and screw it back into your now SET Lock Down Nut. As soon as you feel the screw come all the way through into your boot, back the screw out a little bit, you don’t want to feel the screw! On some boots, you might actually compress the layers and make your RT Disc one with the tread pattern, that’s OK! If the screw is too long, use a shorter one
provided. Once you know the right screw length for the Toe and heel, it will be uniform throughout the boot. Tighten it
down so the disc is snug to the bottom of the boot, not loose. If you go through several sizes of screws before you determine the right length, add a little more RED Thread Locker to your screw as you screw it in, you want to make sure you have some on there or
there is a chance your screw will back out and you lose your Rock Treads disk.
Repeat for every disc you want on your boots and you are done! Check out YouTube for videos on
installation.
Big tip: TAKE YOUR TIME!!! Again, thisisn’t a race!
MAKE SURE YOU PUT YOUR IN
SOLE LINER BACK IN and
you are done!
REMOVABLE SOLE INSTALLATION INSTRUCTIONS
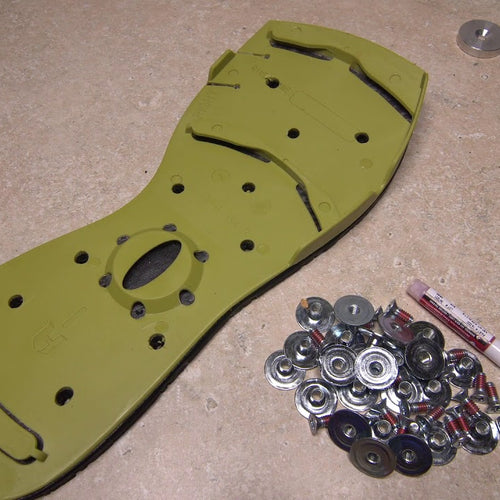
Your Removable Soles Rock Treads Kit includes everything (and then some) you will need to assure a lifelong hold of your Rock Treads, no matter the brand of boot! Read all these instructions first and you will fly through install. This is by far the simplest install of Rock Treads! Drill, screw them in and you are done!
1. Remove your sole, make sure it is clean.
2. Insert your drill bit into a cordless drill.
3. Plan your pattern. You are adding a layer of traction to your boot, keep your disc placement even so they feel even as you run through the river. With Korkers™ avoid the rib/raised plastic area to place your discs, you want the lock down nuts to be flat against the hard-plastic surface. For Hodgman™ H-Lock boots, avoid the “track” or slide in area, again, you want the lock down nut to be flat against the hard plastic. Patterns are available below or come up with your own. We recommend at least 8 discs per boot. Once your pattern is planned, take a picture with your phone for reference.
4. On the backside of the sole, drill through where you want your first disc with the provided bit. Make the hole nice and clean, go back and forth through the sole a couple of times.
5. Pop in the Lock Down Nut on the back side of the sole.
6. Take your first disc and the short, thread lock dipped screw, and screw it into the lock down nut. Do it as tight as you can, the screw tip should not protrude through the top of the lock down nut. These screws are dipped in a special acrylic resin, that is environmentally safe and is also removable if you see fit but will lock the screw in and assure a lifelong hold.
7. Do the same thing for the rest of your discs, install the sole back into your boot and boom, you are done! This install method allows you to remove the soles as you see fit. Rock Treads do not hurt rafts or kayaks but can be rough on a fiberglass drift boat bottom. If using in a drift boat, we recommend you have a mat or carpet down, just in case. There are no sharp edges to dig into the fiberglass, but the aluminum is harder than the fiberglass and can cause scratching to your boat.
Patterns